Showing posts with label EQUIPMENT. Show all posts

Sunday, May 29, 2022

Celestron Mobile Phone Mount


Celestron Mobile Phone Mount

According to photos, the good design of the Celestron Nexyz camera holder does not interfere with the iPhone side buttons which are located mainly towards the top half of the cell phone. Therefore the phone mount will not cause trouble by depressing the side buttons when using the phone for astro imaging. The only concern for small telescopes may be the additional 10 oz. weight.

Wednesday, May 11, 2022

Acuter 60mm Maksutov Tips & Techniques

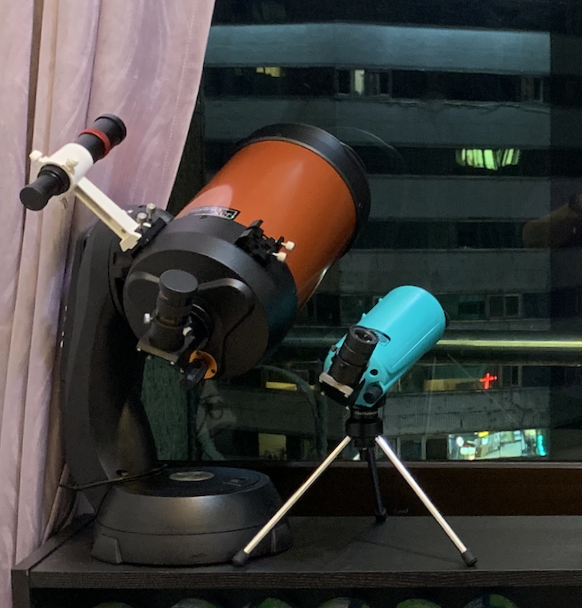
At left, the Celestron Nexstar 6SE. To the right, the new Acuter Maksy 60. Note: the light blue Maksutov does not have a conventional finderscope but rather uses two sighting bumps on the left side of the tube.

THE MINUSCULE MAK SERIES

Acuter 60mm Maksutov First Tips & Techniques

* Periodically check the tripod legs as they may need tightening.

* The frosted projection eyepiece will have a significantly different focus compared to the 20mm eyepiece.

* The frosted projection eyepiece shows the image in 1:1, i.e with no magnification as there are no magnifying lenses present, just a flat piece of glass. The projected image from the telescope is like prime focus, there is no extra magnification, i.e like a 1-inch FL eyepiece, the 750mm focal length will give approximately 29.5x.

* The telescope mount takes a standard 1/4th-inch camera mount/tripod screw

* At a pound weight, the lightweight telescope is perfect for attaching to other telescopes, to have a second powerful telescope, to use as a special finder telescope, to use with an autoguiding setup, to have a second telescope running at the same time but with different parameters (image scale, accessories, etc.).

* Use one of the three mounting holes and vary the position to help balance the telescope.

* The telescope does not need a finderscope, just use the two raised ticks to sight along the tube during the daytime. For nighttime use, dim illumination such as a nearby astro red light can provide just enough light to see it. You can get these on a headband, flashlight or as a nightlight. The red light will help keep the eyes dark adapted.

* When using the accessory solar sun filter, it normally goes on tight and then has an additional two screws to hold it as a safety feature.

* Try using lightweight aspheric EPs to maintain the telescopes lightweight.

* The minuscule 60mm aperture is ideal for viewing through a swath of window glass as it sees a smaller deviated angular wavefront thus making the image more sharp and clear.

* To better balance the telescope with a mobile phone and get greater tripod mount stability, move it back over and above the OTA Optical Tube Assembly.

* When using a mobile phone, use a remote bluetooth shutter. This will prevent the need to touch the phone screen when taking a photo and avoids vibration that degrades the image.

* Keep the side educational cover on to prevent dust from entering the inside.

Friday, April 15, 2022

Change Finderscope Position


Change Finderscope Position
Decide the stance relative to the telescope, either from the back, left side or right side. This will determine which finderscope goes where.

Left: the challenge in this photo shows how the scopes are mounted without attention to observational positioning. Once the scopes are mounted, the positions can be decided. Using dovetail bases can allow for quick interchange. Currently the plastic finder is not interchangeable.

The most frequently used finderscope will be located in the most convenient location. Generally, even a back centered stance will favor the left or the right position. The photo shows three different finder scopes. At right, the Svbony has the ability to show the deepest magnitude. The laser can quickly point to objects at night without looking through it. The middle finder is very lightweight and and shows less magnitude - less confusing during heavily light polluted skies.

Top Photo: for indoor observatory one at Singularity Observatory, observing and astroimaging takes place from the left side.

Wednesday, April 6, 2022

Celestron Nexstar 6 SE Remounting

Celestron Nexstar 6 SE Tripod Replace-ment

The deck observatory floor is too narrow with elevational step levels to accommodate Celestron's tripod for the Nexstar 6 SE telescope. 

The solution is found with an IKEA item of the proper diameter, thickness, shape and stability.

In one possible solution under consideration, the tripod is removed and the telescope GOTO mount sets on top of  a bar stool. The bar stool feet fit on the largest clear floor area so the telescope can operate remote and outdoors. The Celestron tripod for the Nexstar 6SE is a paramount of rock solid stability. It's unfortunate the wide stance of the extended tripod legs are not conducive to fitting on all deck and balcony floor space. However, the solid bar stool makes a good substitute. Unfortunately the bar stool is not high enough to peer over the deck railing and the idea must be discarded.

Deck 2 has a 16-inch width floor with a railing 49.5" high. The telescope is 16" from the base bottom to the top of the tube when pointed horizontal. The circular base is about 6.5" in diameter.

904.621.24 Ikea 2 is 15.4" wide and 29.2" tall. 

                   (16+29.2=45.2", 49.5-45.2=4")  
                   The legs will fit on the floor.
                   The height with telescope is 4-inches below the rail.
                   The bar stool is not tall enough.

Is there another solution using the tripod only?  Open the window door and insert one leg of the tripod through onto the far end of the deck floor butted up against the limit, while the remaining two legs are inside the room. The height is full tripod adjustable.

This laundry shelf unit is 37" tall and 14" wide, wire mesh, 3 shelves. The telescope will set (37+16=53" to the top of horizontal tube)
https://www.ikea.com/my/en/p/omar-1-shelf-section-grey-green-bamboo-s29401554/#content
This also is not tall enough. Aim for a 45" tall shelf unit (114 cm), the Ikea table is 30" high and 77 cm is 30". This is not tall enough.

Look for a shelf unit ideally from 44 to 46" tall. (112 - 117 cm)

Bookcase one may be too narrow and tip over too easily. This IKEA book unit 003.515.78


This is only 15.75-inches wide. Is wider available? The height is good at 41.75".


*** Purchased Sat. Apr. 9, 2022 online *** Bookcase two: Nine in stock. $66, this is 41.75" tall and a better more stable 31.5" wide. It's 11" deep and will fit the 16" deck floor. IKEA #403.515.81
Package is 19.4 kg or 43 lbs. The unit will be delivered and assembled.


Max load per shelf is 30 kg (66 lbs). The telescope OTA and the GOTO mount are about 22 lbs. at one third shelf load capacity. The surface is made from natural wood veneer. 

It has 2 adjustable shelves (adaptable space in between shelves). The base material is particle board, ash veneer, stain, clear acrylic lacquer. The back is fiberboard, foil. It sets on four plastic feet. 


You could slide this onto the deck for use and return indoors when finished or try bungi roping to the railing to prevent tipping (through the two openings at the top of the unit and then cover the unit with a motorcycle covering). 

Add non-slip rubber cut to fit the top and duct tape on so wind or earthquake does not take it. Put the large Meade battery on the adjusted bottom shelf to add weight stability. Operate with the deck door slightly ajar to access the PC computer to control the CMOS camera initially. 

Manage the camera with the USB cable. The app SkyPortal on the iPhone 10 is not working because the compass does not work. However, the compass and app are working on an iPhone 5 smartphone. To remote the computer, use the iPhone 5 and app or a USB cable feed.

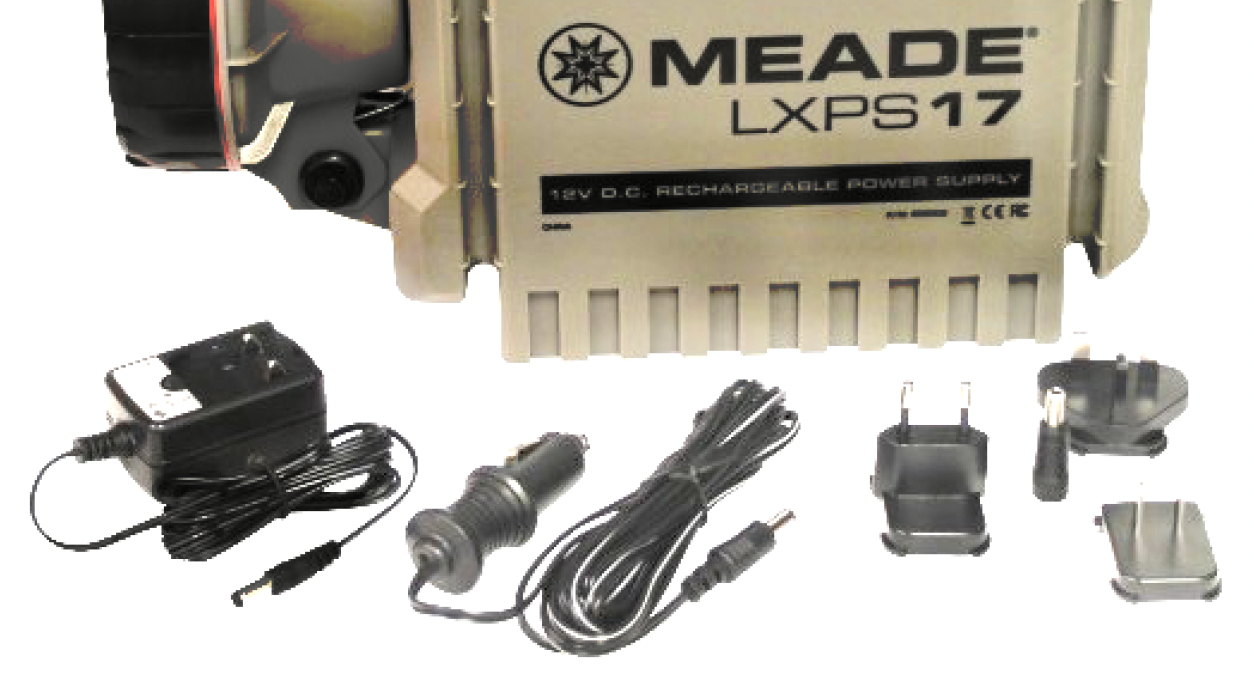
About the Meade Battery LXPS7 
Manufacturer part number: 606001. Meade Power Supply, 12V, 7 amp hour capacity. For field operation of a 12V telescope. The battery can manage the telescope and USB devices requiring power.

With Meade’s new LXPS 17 Rechargeable Portable Power Supply you can easily power your telescope and electronic devices in the field. 12V, with a massive 17 amp-hour capacity. Connect your equipment using the two included 12V cigarette lighter ports, two USB ports, or through the positive/negative terminals on the back. The LXPS includes a built-in circuit breaker and fused circuit to protect your valuable equipment. Includes both USA and international type AC adapter plugs so you’ll be able to recharge the LXPS anywhere you travel. The Meade LXPS also includes an adjustable super bright 30 LED spotlight and white flashlight with red filter attachment, perfect for setting up and tearing down in the dark. Additionally, the LXPS 17 includes an AM/FM radio, siren, and tethered detachable light. The LXPS can also be used for emergency situations like jump starting your car battery. With 17-amp hours, the LXPS 17 is the must-have accessory for star parties, long observing sessions and the dedicated astronomer.

Features a rechargeable lead acid 7AH battery and includes wall charger, LED charge level indicator, two 12V cigarette cord type outputs, power cord (cigarette plug type), hinged LED spotlight, hinged high output LED spotlight, flashlight with red lamp cover and strobe function, two USB outputs rated at 5V, built-in carry handle, shoulder carry strap, and one set of 12V output posts. Product is fuse protected with a replaceable fuse. Weight is 8.4 pounds. Size 11.3 x 9.3 x 5.2" / 28.7 x 23.6 x 13.2 cm.

Tuesday, April 5, 2022

Celestron Nexstar 6 SE Accessory Eyepiece Box

Celestron Nexstar 6 SE Accessory Eyepiece Box
Humanoido has adapted a multi tier tool box for use as a powerful portable astro imaging eyepiece carry-all.

Move this adapted toolbox and place it next to the telescope at the observing site and instantly have access to every accessory needed.

The box is made from steel throughout and even includes a finish of the basic traditional orange Celestron SCT color! This matches the Celestron Nexstar 6 SE telescope OTA. The closed box has two strong tubular steel bars for carrying handles and holes for a lock.

For observing and astro image
sessions with the Celestron Nexstar 6 SE, the box is now equipped with a large assortment of eyepieces, barlows, focal reducers, CMOS imaging camera, atmospheric dispersion corrector, flip mirror, illuminated reticle, tripod, wifi adapter, and other necessities. Other things to be added in the future include cables and filters.

Left: PCHome sells the Treny double handle three tier toolbox sells at half price $27 for the 53-inch wide version, which includes shipping and handling. A smaller 42-inch version sells for $20.

To construct the Astro Imaging Accessory Eyepiece Box, a Treny toolbox was purchased without the tools. The simple modification included buying and cutting foam to cushion the floor of all the compartments. The only items used were a scissors and a black marking pen. The foam is already scored with many small subfacets for easy straight line trimming with a scissors. Just mark the length and width for each compartment.

Left: The Treny 53 x 20 x 20 cm toolbox was purchased from PCHome, arrived in less than 24 hours, and has a two for 15% off sale from the already half price sticker.

Left: Neat and clean when not in use, the eyepiece storage and accessory toolbox fits exactly onto an IKEA shelf. A second accessory toolbox may be needed to store adapters, visual backs, and other equipment which are not needed at every observing session.

I loaded up the tool box to the hilt with every useful accessory I could think of for the night's observing session with the new Celestron Nexstar 6 SE. The loaded box was strong to support the weight and carrying it was convenient and not too heavy. It's reassuring to know nothing is left behind and accessory changes no longer include the previous hunt and peck to find what you're looking for. Stay organized! When not observing, the accessory box sets onto a single shelf.

Left: In India, the toolbox is sold for tools or comes with sets of tools. This reviewer has a user supplied photo of how the box is being used.

PCHome Online Toolboxes

Friday, April 1, 2022

Celestron Nexstar 6 SE Looking Through Window Glass

THE INDOOR OBSERVATORY
Celestron Nexstar 6 SE Looking Through Window Glass

This ongoing page is dedicated to indoor observing by looking through window glass with the Celestron Nexstar 6 SE telescope.

Years ago when astro imaging with small telescopes, like the 2.99-inch Celestron Firstscope, it was discovered that it was possible to photo solar system objects through a closed window while the telescope remained indoors. The window was kept closed to avoid the excessive summer heat, high dew forming humidity, and deadly bugs and killer mosquitoes carry Dengue Fever. This indoor observatory also experimented with a Celestron EdgeHD 14 and 9.25-inch telescopes. Now moved to a new location with more space, more windows, and newer windows, indoor telescopes will prevail.

There are several tricks to observing through window glass to get the best results, some of which are controllable and some are not. Here's the top of the ongoing bucket list:

* Have access to new white float glass with higher precision flats
* Do not use tinted glass
* Clean the both sides of the glass just before observing
* Do not use double or triple insulated windows
* Keep the window closed
* Inspect & remove any dew, frost or dust from the glass when observing
* Do achieve indoor thermal equilibrium with indoors/outdoors
* Move the telescope as perpendicular as possible to the glass
* Measure window aperture, plot when objects will become visible using
   planetarium software
* Measure & know clear sky altitude, azimuth and horizon
* Have exact latitude longitude for telescope GOTO
* Computer image "process out" window glass
* Subtract any secondary reflections from the back of the glass
* Make any color corrections necessary
* Boost compensation contrast & sharpness as necessary
* Smaller telescope apertures may minimize aberration differentials
* Move the telescope closer to the glass to increase sky viewing area
* Use lower EFRs to minimize magnifying any defects
* Avoid glass bubbles, striations or any defects
* Avoid telescope tube obstruction by window frame
* Correct for achromatic and chromatic aberrations from the window glass

How to Subtract Achromatic Chromatic Aberrations
Depending on factors (window glass type, angle of telescope relative to the plane of the window), correct for typical achromatic chromatic aberration from the window glass when the image has blue on one side and red on the opposite side by employing a ZWO ADC Atmospheric Dispersion Corrector to correct the image at the telescope. Aberration effects can also be minimized through final image processing on the computer.

Singularity Observatory Telescope Indoor Observing

Singularity Observatory Indoor Observing Success!

August 30, 2020 Celestron FirstScope Image through Window Glass Project

Indoor Observatory

Singularity Observatory Telescope Indoor Observing

Space1 Glass Portal

Celestron Firstscope Image Through Glass

Singularity Observatory Diving through Glass

Wednesday, March 30, 2022

Celestron Nexstar 6 SE Unboxing

Celestron Nexstar 6 SE Unboxing
On Tuesday March 29, 2022, the Celestron Nexstar 6 SE telescope arrived and was placed next to the door at about 11:45 am.

The approximately 45 lb box appeared set on its side to take up minimal space in the traffic hallway next to the owners home door. When moved, it made a frightening rattling and broken glass sound. As it was marked 2-people lift, it was carried in by two people and correctly set on its bottom.

The box itself had incurred some damage and had been carefully covered over with clear strapping tape. It had a couple puncture wounds on the top lid, also covered with tape. The box was opened once or twice from the time of its original sealing. All things considered it appeared in relatively nominal condition after traveling from the USA, to South Korea, to Hong Kong, and finally to Taiwan.


The side of the box had a rather large deep incursion which was mended with clear strapping tape. 


The box top had received two puncture wounds shown on the right side of the lid as shown in this photo.


With pure luck, these two puncture wounds did not penetrate the second sealed boxing layer. So far, the telescope and tripod were packed well in these two boxes and were protected from any visible damage at this stage in the unboxing.


Opening the inside large box revealed a series of smaller boxes. From left to right counterclockwise, the boxes contained the telescope mount, the optical tube assembly (OTA), a cardboard spacer, and the box holding the eyepiece, finder, and star diagonal.


When opened, the tube assembly was found connected to the mount, connected on the arm. Two pieces of protective foam encircled this part of the telescope.

The tripod was another story. As seen at the top in the photo, the pointy side of the legs had dug into the protective foam, gouging out a large area.

To the left in another box was the wrench and the tripod leg spacer plate.


The box aat left contained a 25mm Celestron Plossl eyepiece, a Celestron 1.25-inch diagonal mirror, and a red dot finder found to not fit onto the already installed slide mount on the OTA.

Now it was time to set the parts on the table and inspect in more detail.

In the next post, we'll learn more about the alarming broken glass sound.


Tuesday, March 29, 2022

Celestron Nexstar 6 SE Order


Celestron Nexstar 6 SE 150mm f/10 Schmidt Cassegrain GoTo Telescope Order

The order was placed online 3/22/2022 with B&H in the USA because their telescopes were in stock and they shipped to Taiwan. The telescope ($1099) was ordered with Celestron's 5-Amp AC Adapter ($85.95). This came to $1184.95 subtotal with International DHL Express shipping $113.81 and duties and tax at $107.33 for a total of $1406.09. Estimated delivery time was 4 to 7 days. In the final analysis, the package arrived in 7 days on Tuesday. B&H shipped the order the same day it was placed. The next option for shipping at 3-5 business days, not chosen, was Fed-ex at $227.81.

B&H included free, a Nitecore Tube v2 LED Keychain Flashlight (white light) and a Celestron 1.25" Moon Filter. Unfortunately after ordering and the order was shipped, the same web site suddenly reflected a telescope price at $999 instead of $1099. B&H was contacted by the online form with no reply. Then the message was sent by email and a resolution has not yet arrived as of Thursday March 31. The telescope arrived Tuesday morning at 11:45am local time. Several calls were placed to DHL Taiwan regarding the shipment when in transit due to some very strange tracking reports coming out of Hong Kong. More on this later.

The package appeared outside in the hallway, set by the door. It was lifted and carried into the room by 2 people. When lifted, it made a sound like the jingling of broken glass. The single box weighed about 45 lbs. When unboxed, the set screw on the visual back had come loose and was jiggling around but nothing was harmed or scratched. The order was divided into two boxes, one for the telescope and one for the AC Adapter. The AC power adapter had arrived on Monday, a day earlier in a small box.

Tracking reports were maddening. At first, they indicated the shipment running in a circle and going to and from repeat states. It seemed to take ages to leave the country. The reports continuously reported it would clear customs during transit. Apparently that never happened. It went from state to state and eventually ended up in South Korea. After Korea, it was shipped into Hong Kong where COVID is a big problem. Suddenly the reports became strange. They claimed an accident happened and authorities would permanently hold the package until the law was changed or otherwise. Another oddity, each time the tracking report was reviewed, the shipping agency rewrote the tracking steps. It seemed the package would be destroyed along with the plane and the delivery man died. Putting these horrors aside, phone calls were made to the Taiwan agency where they said it would be delivered on Monday. On Monday, only the AC adapter was received and the telescope was still stuck in Hong Kong, permanently, they said. It was surmised the small box caught one plane and the big box waited for the next plane. It finally arrived in Taiwan and was cleared, then sent out for delivery on Tuesday morning.

Photos were taken showing the unboxing and later the telescope was assembled. The red dot finder did not fit onto its slide mount and was set aside along with the slide mount that was removed from the OTA. A different Celestron lightweight finderscope was mounted on the OTA. The retainer on the power cord had no room to lock onto the power jack on the telescope mount so the cord was wrapped around the base of the mount arm. Batteries were installed so the tube could be moved to a better position. After selecting English on the hand controller, the tube moved by pressing the arrow buttons. The tripod was extended and leveled using the tiny bubble level. The plan is to add a zippered pouch to prevent losing the parts.

The star diagonal was attached and the 25mm Plossl eyepiece inserted. Do not set anything on the battery compartment lid as it curves and things will fall off. When the power is on, the hand controller is lit. Be sure to turn off the power when working on the telescope to save batteries. As this telescope will, for the most part, focus on the Moon and planets, a Bahtinov mask is not needed. However, the reason the more powerful AC adapter was chosen is because the telescope will be expanded with accessories that draw more power such as the WIFI module, dew heater (or hair dryer) and Motor Focuser. Visual inspection shows a superbly crafted telescope without any obvious flaws.

The night is overcast so an optical analysis will need to wait. As the viewing sky is limited to a small east section obscured by a short roof and tall skyscrapers to the left and right, two and three star alignment will not work, therefore the telescope must compensate by using Solar System Alignment. As the site is extremely light polluted and no stars may be visible, this is likely the only viable option. On some nights when the haze is less, a few stars may become visible and the one star alignment may work. All in all, this is the perfect telescope for these urban light polluted and hazy sky conditions.

Tuesday, March 22, 2022

Celestron Nexstar 6 SE Dealer Data

Celestron Nexstar 6 SE Dealer Data
New Telescope on the Way!


There are numerous reasons for ordering this new telescope: a Celestron NexStar 6SE 150mm f/10 Schmidt-Cassegrain GoTo Telescope. This page lists dealer quotations.

Review the advertised quotations
In Stock $1,099.00
Key Features
150mm Schmidt-Cassegrain Telescope
1500mm Focal Length, f/10 Focal Ratio
StarBright XLT Optical Coating System
Single-Fork Motorized GoTo Alt-Az Mount
25mm Eyepiece and StarPointer Finder
SkyAlign Alignment Technology
NexStar+ Computer Hand Controller
40,000+ Object Database with Sky Tours
Stainless Steel Tripod

Overview
Celestron's NexStar 6SE 150mm f/10 Schmidt-Cassegrain GoTo Telescope is a powerful, portable, and user-friendly Schmidt-Cassegrain-style scope that can be used for observing everything from the Moon and planets to deep-sky objects like stars, galaxies, and nebulae. Using Celestron's proprietary StarBright XLT multi-coating system,

Celestron's NexStar 6SE 150mm f/10 Schmidt-Cassegrain GoTo Telescope is a powerful, portable, and user-friendly Schmidt-Cassegrain-style scope that can be used for observing everything from the Moon and planets to deep-sky objects like stars, galaxies, and nebulae. Using Celestron's proprietary StarBright XLT multi-coating system, light transmission is increased throughout the entire optical path with anti-reflection multi-coated lenses, highly reflective multi-coated mirrors, and crown optical glass elements. While the focal ratio is a relatively slow f/10, the mount's precision tracking system allows it to be a competent shorter-exposure astrophotography imaging platform for the Moon and planets.

Driving the dual servo motors on the mount is the brain of the NexStar 6SE: the iconic NexStar+ computer hand controller. Packed with 40,000+ celestial objects, it can hold up to 100 additional user-defined destinations and is updatable via the Celestron website. It has multiple alignment procedures to get you observing fast—including the super-easy SkyAlign system. Capable of being used in the Northern or Southern Hemispheres, the NexStar has sidereal, lunar, and solar tracking speeds to accurately follow near- and deep-sky objects, plus nine slew speeds and the ability to automatically trigger a camera's shutter release for Fastar or piggyback wide-field photography or conventional prime-focus astrophotography.

Performance

6" (150mm) aperture
f/10 focal ratio
1500mm focal length
Crown optical glass primary mirror
StarBright XLT optical coatings: Multi-layer aluminum/SiO2 (quartz)/TiO2 (titanium dioxide) mirror coatings with flat reflectivity across the light spectrum for both astrophotography/astroimaging and visual observation
Multi-layer MgF2 (magnesium fluoride) and HfO2 (hafnium dioxide) anti-reflective lens coatings
High-transmission water white glass corrector lens with 97.4% light transmission
Internal focusing mechanism
Resolution: 0.93 arcsec (Rayleigh); 0.77 arcsec (Dawes)
Secondary mirror obstruction: 2.2"; 37% by diameter; 14% by area
Fastar capability: Secondary mirror can be removed and a DSLR or imaging rig mounted in its place for fast f/2 wide-field astrophotography

NexStar+ Computer Controller

2-line, 16-character LCD display
19 fiber optic backlit red LED buttons
Database of over 40,000 celestial objects plus 100 user defined
Automatically slew to planets, stars, constellations, and a variety of catalogs
Camera control: For piggyback wide-field or conventional astrophotography through the optical tube assembly, the controller can automatically trigger the shutter release to capture the image
Anti-backlash compensation programs out play between gears for more precise tracking
Tour Mode: Shows a selection of the most popular objects for the time and date you are observing
Constellation Tour: Allows you to take a tour of all the best objects within a particular constellation
Alignment procedures: SkyAlign, Auto 2-Star, 1-Star, 2-Star, and Solar System
SkyAlign alignment: Takes minutes, with minimal effort or experience—point the telescope at three bright objects in the sky, and the telescope does the rest
Nine slew speeds: 5°/sec, 3°/sec, 1°/sec, 2x, 4x, 8x, 16x, 32x, and 64x
Sidereal, Solar, and Lunar tracking rates for observing the fast-moving Moon to slower-moving deep-space subjects
Tracking modes: Alt-Az, EQ North, EQ South, Off (no tracking when using as a terrestrial spotting scope)
Mini-USB communication port allows for computer control
Flash updatable via the Celestron website

Database Details:

Solar system objects including the Sun, Moon, and planets
Named objects
Stars: Asterims, variable stars, double stars, named stars
Caldwell catalog
Messier catalog
NGC catalog
SAO catalog
Constellations

Mount & Tripod
Mount: Single-fork alt-az
Dual-axis servo motors allow for precise tracking with virtually no vibration
Motor resolution: 0.26 arcsec
Optical encoders track mount movement to improve tracking and GoTo accuracy while allowing the mount to maintain alignment when moved manually
Communication ports: Autoguider port, Aux port, hand controller
Runs on eight user-supplied AA batteries or optional 12 VDC power supplyTripod:
Stainless steel legs
Adjustable height accommodates a variety of observation positions or users
Tray holds accessories such as eyepieces and filters and adds stability and vibration reduction
Weight: 10 pounds

Included Accessories

Eyepiece: 1.25"-diameter barrel
25mm focal length produces 60x magnification
Anti-reflection multi-coated glass improves color rendition and contrast
Threaded barrel accepts most 1.25" astronomical filters
Fold-down rubber eyecup for use with or without eyeglasses
44' field of view at 1000 yards

Diagonal
1.25" input and output accepts most 1.25" astronomical eyepieces and accessories
90° angle puts head in a comfortable position when observing at or near the zenith
Corrects view horizontally, but not vertically.

StarPointer Finder

Projects a single red dot in line of sight
Unmagnified view ensures a wide field of view to make finding objects faster and star-hopping navigation easier

Celestron 6SE Specs
Optical Tube Assembly
Optical Design Schmidt Cassegrain
Aperture 150 mm / 5.9"
Focal Length 1500 mm
Focal Ratio f/10
Focuser Internal
Eyepiece Barrel Diameter 1.25"
Diagonal 90° Star
Finderscope Yes
Optical Tube Dimensions Length: 16" / 40.6 cm

Mount
Type Motorized; Alt-Azimuth Single Fork
GoTo Capability Yes, NexStar

Tripod
Type Adjustable
Material of Tripod Stainless Steel

General
Batteries 8 x AA
GPS No
Wi-Fi No

Weight
Tripod 10 lb / 4.5 kg
OTA Optical Tube Assembly 10 lb / 4.5 kg
Altazimuth Mount 11 lbs
OTA + mount 21 lb / 9.53 kg
Total assembled (OTA + Mount + Tripod) 31 lb
Package Weight 42.25 lb

Packaging Info
Box Dimensions (LxWxH) 32 x 26 x 13

Wednesday, August 18, 2021

AMPING UP THE NEW ASTRO IMAGING LABORATORY

Today is a good day for revamping the entire astro imaging laboratory, taking advantage of a rare good health day and some remarkable weather inside one of the 20M slots.


We are deploying three telescopes simultaneously for departmentalized work. Mountains 25 miles away are crystal clear and it's now possible to collimate our new lasers by beaming directly into the mountain.

When MB Mountain Beaming is complete, the Moon is next. Apollo astronauts left a moon reflector plate on the moon for laser experiments, to our benefit. Current work is on a new sequential tunneling penetratory imaging project.

In regard to multi-purposing, work progresses on  ground penetrating electrodynamic imaging for moons and planets as the precursor to our colonization and the search for underground resources or the penetration of lunar and planetary atmospheres.

Thursday, August 12, 2021

Unboxing the Orion StarBlast II EQ 4.5"

Unboxing the Orion StarBlast II EQ
Orion makes two different StarBlast f/4  4.5-inch diameter telescopes, the StarBlast and the StarBlast II EQ. The first sets on a modified Dobsonian mount, and the latter has an Equatorial mount and motor drive. Let's take a look at unboxing the the StarBlast Equatorial version, with the AstroTrack Drive.

The telescope is shopped in one box which is protected by another full size box. The assembled weight of the telescope is listed as 20.7 lbs. Inside are a series of smaller boxes fitting together like a jigsaw puzzle, each holding parts except one box which is an empty space holder. The parts and components were adequately protected for international shipping.

The telescope parts were set out on a round table and then sorted. Everything was present except for the printed manual - it was for another telescope. So I had no assembly instructions but assembly is so simple and easy that no instructions are needed. If instructions are needed, the pdf file can be downloaded at the Orion website or several videos from Orion are available on YouTube. 


In the Box
Orion 4.5" f/4.0 reflector telescope optical tube assembly
Orion AstroTrack Motor Drive
25mm Orion Sirius Plossl telescope eyepiece (1.25")
10mm Orion Sirius Plossl telescope eyepiece (1.25")
Tripod legs
EQ-1 equatorial telescope mount
EZ Finder II reflex sight aiming device
Collimation cap
Tube rings
Counterweight
Counterweight shaft
Tripod accessory tray
Slow-motion control cables
Latitude adjustment T-bolt
Orion MoonMap 260

Friday, July 16, 2021

Orion StarBlast Color

Orion StarBlast Color
The color of the new Orion StarBlast Dobsonian telescope is a remarkable story to behold

Many white OTA telescopes had flooded the market in the past and white became so common that many telescope makers began using alternate black color.

After a number of years of stumbling over and into black telescopes in the darkness of night, black was deemed no longer creative and Orion began looking for new colors of originality for the lineup.

Signature red was of course taken up by Edmunds red Astroscan telescope and Celestron made a popular line of orange Schmidt-cassegrain telescopes.

The most creative and unusual esteemed and royal colors were sought after and reviewed. Teal was a new web color formulated in 1987.

In the 1990's Teal was a cyan-green fad color for sports and it was adopted by many teams for the color of their uniforms. The color is believed to originate from the common Teal, a member of the duck family whose eyes are surrounded by this color.

Teal green is a darker shade of teal with more green and is a variable color averaging a dark bluish green that is green, darker, and stronger than invisible green or pine tree. Teal green is most closely related to the Crayola crayon color Deep Space Sparkle. Air New Zealand picked Teal green as their signature airline color.

In 2003, the California-based Orion Telescopes and Binoculars introduced the StarBlast, a 4.5-inch Newtonian reflector grab and go telescope with a Dobsonian mount. The telescope became popular with both kids and adults and even libraries have some for checkout. When Orion Telescope Company formulated the signature StarBlast OTA color, they went a step further than white or black and formulated metal teal pearl color. The tube finishes were embedded with scintillating sparkles of a metal appearance (a borrowed technique of creating finer car finishes).  Under certain lighting it looked like tiny pinpoint stars making up the tube finish, a fantastic and very original sight to behold.

Wednesday, July 14, 2021

Laser Calibrating the Orion StarBlast Telescope

Laser Calibrating the Orion StarBlast Telescope using the Svbony Next Generation Adjustable Deluxe Laser Collimator

First make a mount to hold, test and calibrate the laser collimator using some everyday common household items. Supplies and tools include a bag of aquarium gravel, peanut butter jar, extra peanut butter jar lid, duct tape, scissors, wire cutters, emory stick, and the wrench for the laser collimator. 

Left: the laser collimator is set on top of the homemade mount as shown. Turn on the laser and point it to the opposing wall about 3 meters or 12-feet away. Slowly rotate the collimator and observe the red dot. If it stays in the same position, the collimator is ready for use.

Fill the peanut butter jar with aquarium gravel to give it weight. Cut two opposing V notches in the extra jar lid. Sand smooth with the emory stick. Duct tape the lids together as shown. On the collimator, remove the threaded collar to expose the adjustment set screw. Turn on the collimator and point to the opposing wall about 9 meters or 12 feet away. Rotate the collimator and observe the red dot. If the dot remains in the same location, the laser is collimated. If not, use the allen wrench and adjust the set screw until the dot remains centered. The laser collimator is now ready to adjust the StarBlast telescope and other Newtonian telescopes.

Left: the Svbony collimator includes the adjusting allen wrench, a 2-inch adapter, a preinstalled battery and
instruction manual.