Showing posts with label MOUNT. Show all posts

Friday, May 27, 2022

Mount Calibrating Solar System Objects

Celestron Goto Mounts - Align without Stars!
Mount Calibrating Solar System Objects


Quick-Align uses all the date and time information entered at startup to align the telescope, However, instead of slewing to the alignment stars for centering and alignment, the telescope bypasses this step and simply models the sky based on the information given. This will allow you to roughly slew to the coordinates of bright objects like the Moon and planets and provides the telescope with information needed to track objects in any part of the sky (depending on accuracy of polar alignment). Quick-Align is not meant to be used to accurately locate small or faint deep-sky objects or to track objects accurately for astroimaging.

To use Quick-Align, simply select Quick Align from the alignment options and press ENTER. The telescope will automatically use the entered date/time parameters to align itself with the sky and display Alignment Successful.

By Decimal
Latitude: (+) 25.0409° N
Latitude: (+) 121.5720° E

By Degree, Minute, Second
Latitude: (+) 25° 02' 5.40" N
Longitude: (+) 121° 34' 3.59" E

Time Zone
Time zone in Xinyi District, Taipei City (GMT+8) Greenwich Mean Time
or UTC +8, Coordinated Universal Time
https://otisastro.blogspot.com/2022/03/celestron-nexstar-6-se-planet-tracking.html

SOLAR SYSTEM ALIGN WITH NESTAR 6SE
Solar System Align is designed to provide excellent tracking and GoTo performance by using solar system objects (the Sun, Moon and planets) to align the telescope with the sky. Solar System Align is a great way to align your telescope for daytime viewing and a quick way to align the telescope for basic nighttime observing.

To perform a Solar System Align
1 - Once the telescope is powered on, use the SCROLL UP and SCROLL DOWN buttons to select Solar System. Align Press ENTER

The hand control will display the last time and location information that was entered into the hand control. Press ENTER to accept the current information or press BACK to manually edit the information (see SkyAlign section on page 10 for detailed instruction on entering time/site information).

2 - The SELECT OBJECT message will appear in the top row of the display. Use the SCROLL UP and SCROLL DOWN buttons to choose a Solar System object (a planet, the Moon, etc ) to use for alignment. Press ENTER

3 - The hand control will then prompt you to use the direction arrow buttons to slew the telescope to the alignment object and carefully center it in the finderscope. Press ENTER when centered.

4 - Then, center the object in the eyepiece. Press ALIGN

Once in position, the NexStar SE will model the sky based on this information and display “Align Successful”

Celestron Nexstar 6 SE Planet Tracking

Thursday, May 19, 2022

Celestron CGX/L Mount

Celestron CGX/L Mount
PREPPED, PRIMED & READY FOR ACTION

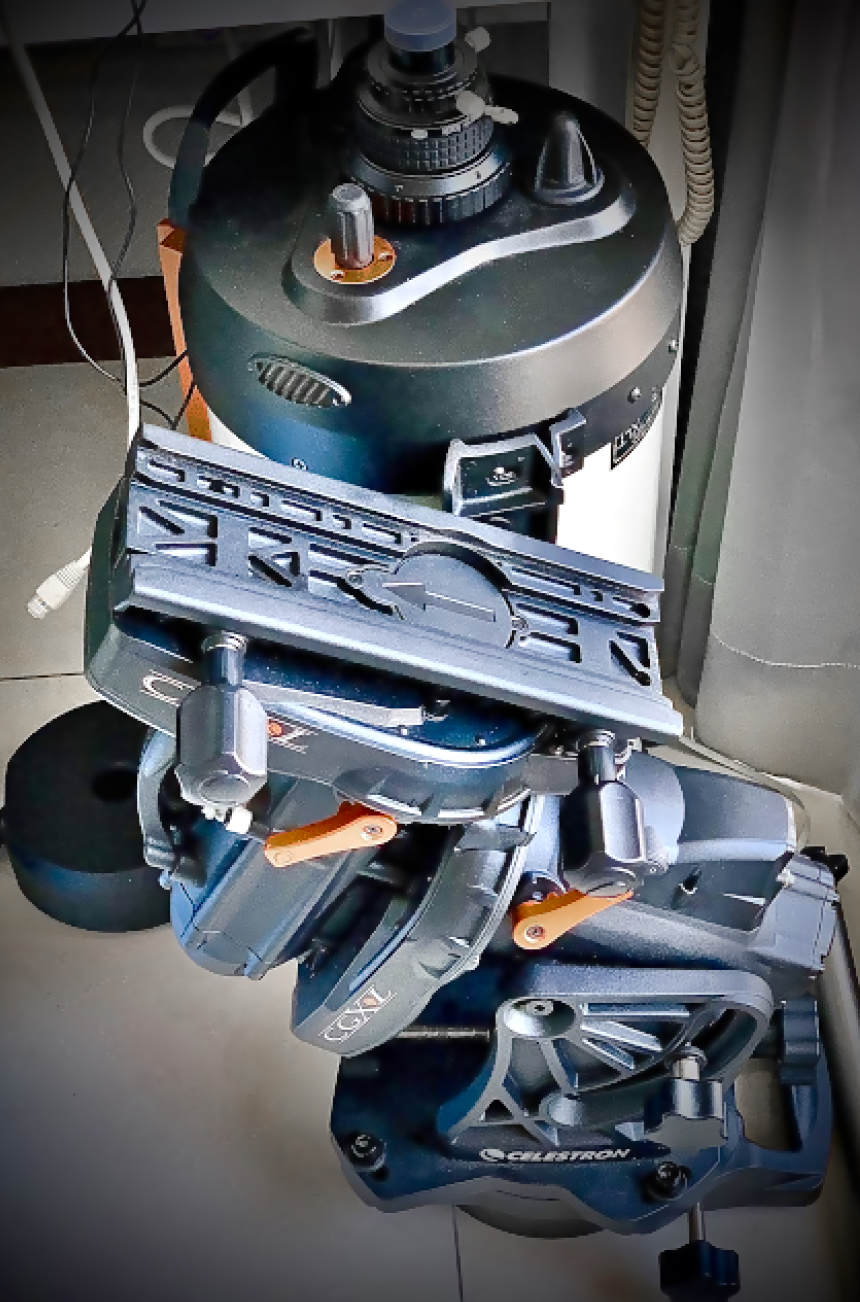
The Celestron CGX/L Mount with equatorial head is waiting for transfer to the permanent observatory.

Dwarfed in the background is a Celestron 9.25-inch Schmidt-Cassegrain EdgeHD OTA also waiting for completion of the largest observatory. The mounting and head, despite its handles, became too heavy to lift for one person.

The mount is an electronic digital goto that must avoid placement near any strong magnetic fields. The challenge is balancing the location of the largest observatory against the convenience of access.

Tuesday, April 27, 2021

Celestron Firstscope Camera Mount

Celestron FirstScope - Mounting a Phone Camera

The Celestron FirstScope is a telescope sold at toy companies. It has serious astro abilities when upgraded. For astrophotography and astro imaging, a camera mount is needed to steady the camera and stop motion blur.

No ordinary camera mount will work, as the telescope does not have a tube that can be rebalanced. This means finding and   using a very light weight camera mount is necessary. For example, the Celestron NexYZ camera mount may be too heavy for the small firstScope.

There are several good low cost mounts cast from polymer that weigh almost nothing. The mount in the illustrated example cost $6.98 including shipping and fits the iPhone Xs Max.
The camera is firmly held in place with spring loaded sides that tightly grip the phone sides. A screw adjusts to hold the ocular which carries the entire mount. The phone position is infinitely adjusted with a tightening knob after the phone is positioned directly above the eyepiece, or before attaching to the telescope (an example in the video). The photos are self explanatory. As the camera will add the majority of the weight, increase the tension on the Dobsonian mount. Make sure to mount the camera along the telescope tube and optical axis for best balance and to minimize any rotational imbalance. Experiment with other mounts, brands and sizes of phones.

https://www.youtube.com/watch?v=C8EIyocVRJI

Tuesday, September 1, 2020

Celestron Genius Gone

Celestro
n: Genius Gone
Companies are often founded by genius, men who have great visions and make their dreams come true, often changing the world for the better in the process. Tom Johnson was one of those great genius men who changed the world.

Tom Johnson was a genius who founded Celestron with his pioneering spirit and vision, and with a brilliant creative framework put into forward motion a revolutionary new method of mass producing an affordable Schmidt Cassegrain telescope design, allowing millions of amateur astronomers to pursue their passion for astronomy. 

But what happened along the way? What happened on March 13th, 2012 when Mr. Johnson died? Often times the common workers cannot come close to the genius capacity of the founder and the vision is lost to the winds and drifting sand of empty eternity. Such is the case with Celestron that designed one of the most spectacular telescope mounts in the world, making telescopes as large as the 14-inch edge HD rock steady in performance. But wait. Exactly what happened along the way in the effort to make an almighty buck, save a penny, and cheapen a fantastic design? What happened when Celestron sold out manufacturing to a country who could care less about quality or the telescope vision?

I'll tell you what happened. The new CGX/L mount has a design that calls for aluminum. Pure aluminum. To save a penny, the manufacturer secretly pitched in cheap ferrous slag, to pad the pure aluminum making it impure, and magnetic, and no longer conforming to the original design. Fake Celestron had become something else, cutting corners, and cheapening the vision and dream that master Tom Johnson had worked so hard on achieving. Like a fool, I purchased the CGX/L telescope mount, a 14-inch EdgeHD OTA, and ALL the accessories. I was totally unaware of the lurking nightmare hiding inside the telescope mount - the monster of pure non-magnetic aluminum that was ferrous slag filled like a garbage dump, causing the telescope mount to become a silent war of irradiating EMI/RFI, a  jamming device of your worst nightmare.

The pure non-magnetic aluminum in the Celestron CGX/L telescope mount
design was contaminated with ferrus magnetic slag gunk that wrecks havoc
with Celestron's accessories including GPS, WIFI, remote, and a pool of
other expensive accessories. Celestron ported manufacturing to another
country that cut corners to save a penny at full disregard to astronomers
buying the ill-fated accessories.

So what? Who cares you say? Consider this. The mount is worse than the Bermuda Triangle, spewing forth powerful random magnetic lines of force, driving compasses and sensitive electronic devices wild and crazy. It stops wifi signals, blocks wireless internet, causes erroneous GPS, makes compasses have faulty readings, inclinometers fail, blocks radio signals, interrupts cell phone communications, makes planetarium software go awry, and results in telescope remote control software becoming dangerously random with the massive mount and counterweights swinging in unpredictable directions. It kills the sensitive results of electronic pointing devices. In a nutshell, it makes all those accessories useless.

A common malpractice of adding impure ferrous junk to
pure aluminum cast to save money and cheapen the product
introduces unwanted effects like magnetism.

After spending over $20,000.00 with Celestron, I have a heap of useless trash, a GPS module that does not work, a WiFi box that fails, a planetarium program with a telescope mount control program that fails, a magnetic north finder that fails, a phone with failed internet, failed apps, and the list goes on and on. While numerous people have complained about the same problem, Celestron tells each person, this is the first we heard of that and then offers no solution. Is there a solution? Unless you have one of the world's largest degaussing machines to strip the massive mount of all its deadly strong magnetism, the remaining electronic technology devices sold to make the telescope easier to use will be useless and functionally dead.

Wednesday, August 19, 2020

Random Thoughts

Random Things - New Telescope
The Celestron Equatorial Head CGXL is larger than the entire
C9.25" OTA. The massive and heavy system is being removed
from the observatory balcony to make room for the new
Unistellar eVscope for both planetary and deep sky work.

The eVscope app will compensate for light pollution when "City" is chosen. Other options include Suburb and Countryside.
The new Unistellar evscope is close to working but not there yet. I'm waiting for tonight when our international times match up for a phone call between OPT in California and here in Taiwan. In the meantime, I'm making more space by removing the massive Celestron telescope and mount from the patio and storing it inside. The high resolution planets will need to wait for another opposition during another year.

The room has become a jungle of telescope. The 3-inch Dob is moved to the shelf. The 9.25 is on the floor by the desk. The C14 is in the closet. The mount is in pieces by the doors and shelves. The eVscope takes center attraction, is charging while waiting for another night under the sky, only this time it will have the entire patio to itself. This should increase the size of the available sky towards the East, Southeast, and Northeast.
When you have an image you like, you can save it with
this "save image" or "download photo" icon. You can
also use a screen capture, or pinch enlarge the image
and then screen capture it.
The focus is now on the eVscope. In fleeting moments, the live unenhanced screen in a random section of the sky showed 12 stars when the light pollution was so heavy I could not see one star by unaided eyes. The telescope has real potential in cutting through a Bortle 9-10 sky.

TIP: I have confirmed the telescope won't boot up when the house wifi is dominating the signal. You must turn off the house wifi and the telescope will boot properly in about 5 seconds.

TIP: The fastest telescope in Asia! - I keep the eVscope inside assembled with the tube on the opened tripod. Then before observing, carry the telescope outside through the opened sliding glass patio door and set it there. It takes about 3 seconds to do that! I use the iPhone flashlight to look at the level bubble and confirm it's centered - about 10 seconds. Then the telescope can set there, with the tube cover removed, for about a half hour to reach thermal equilibrium.

TIP: Mercury vapor lights from the ballpark, shining directly on the front of the telescope tube, will cause image noise and pink color stripes. Make sure there are no lights shining on the telescope.

I had pressed a GOTO button and before the new scope disconnected it slewed directly to Neptune and placed it in the center field of view! The potential for this telescope is tremendous!

In removing the Celestron, once again there is confirmation about this system being too large and heavy to handle. Just breaking it down into the basic pieces to bring inside took around an hour. On the other hand, the eVscope is just hand carried outdoors and ready to go in three minutes.

Wednesday, July 22, 2020

Celestron CGXL Mount Part 7

Let's take a look at what Celestron has to say about their own CGX-L Mount

CGX-L EQUATORIAL MOUNT AND TRIPOD $3599 July 2020
Item #: 91531 Warranty: 2 Years
Celestron's CGX-L Computerized Equatorial mount is the latest addition to our fully computerized equatorial mount series. Capable of carrying Celestron’s largest optical tubes with ease, CGX-L is designed for backyard observatories and remote imagers looking for exceptional load capacity to weight ratio, compact design, and innovative features that fully support large telescopes, imaging kits, and the latest in wireless tech accessories.

Key design goals included larger 144mm diameter worm wheels which provide smoother operation and can more accurately drive heavier loads, longer 270mm dovetail saddle to support larger optical tubes, remote operation friendly features such as home and limit optical sensors, easier polar alignment adjustments, and better cable management overall. In addition to that, we’ve made mechanical and ergonomic improvements throughout to make the mount sturdier, easier to use, and easier to transport. COMPACT. ERGONOMIC. INNOVATIVE.

Mount Type - Computerized Equatorial
Instrument load capacity - 75 lbs (34 kg)
Height adjustment range (includes mount and tripod) 908.05mm - 1339.85mm (35.75" - 52.75")

Tripod Leg Diameter - 69.85mm (2.75")
Steel tripod with graduated markings on lower section
Latitude adjustment range - 3° - 65°
Mount Head Weight - 52.6 lbs (23.8 kg)
Accessory Tray - Yes
Tripod Weight - 46.2 lbs (21 kg)
Weight of Counterweights - 1 x 22 lbs
Slew Speeds - 9 slew speeds
Slew max speed - 3°/second
Tracking Rates - Sidereal, Solar and Lunar
Tracking Modes - EQ North & EQ South
GPS - N/A
Dovetail Compatibility - Dual saddle plates (CG-5 and CGE saddle)
Number of Auxiliary ports - 4 Aux ports (Hand Control can use any Aux port, 2
are located near the dovetail saddle for optional accessories)

Autoguide port - Yes, 2 ports (one is located near the dovetail saddle)
USB Port - Yes, input for Mount and Hand Control
Power Requirements - 12V DC, 3 amps
Motor Drive - DC servo motors
Alignment Procedures - 2-Star Align, 1-Star Align, Solar System Align, Last Alignment, Quick Align

Periodic Error Correction - Yes
Computerized Hand Control - 2 line x 18 character backlit Liquid Crystal Display - 19 LED backlit buttons, USB 2.0 port for PC connection
NexStar+ Database 40,000+ objects, 100 user defined programmable objects. Enhanced information on over 200 objects

Software - CPWI Telescope Control Software, Celestron Starry Night Special Edition Software, SkyPortal App

Total Kit Weight - 120.8 lbs (54.8 kg)
Included Items - CGX-L Equatorial Head | CGX-L Tripod | Accessory Tray | 1 x 22 lbs counterweight | NexStar+ Hand Control | DC Power Cable (item# 18769) | 8mm Allen wrench (contained in rear carry handle)

Summary
Increased 75 lb load capacity
Exceptional load capacity to weight ratio
Additional Aux accessory ports and autoguider port on the Dec axis for better cable management

Larger 144mm diameter worm wheels to better and more accurately drive heavier loads

Longer 270mm dovetail saddle to better support larger optical tubes
Massive 70mm stainless steel tripod legs with a wider stance for improved stability under heavy loads

Accessory tray holds three 1.25” and two 2” eyepieces with an upright stand for your smartphone or tablet

Heavy duty, 31.5mm stainless steel counterweight shaft to support additional counterweights

Spring-loaded brass worm wheel and stainless steel worm gear reduce friction and provide optimum gear mesh

Internal cabling for worry-free remote operation.
Power input and lower accessory ports remain stationary while the mount slews to avoid snags

Includes Celestron's PWI telescope control software, co-developed by PlaneWave Instruments. Software features multi-point mount modeling for extremely precise pointing accuracy

Adjustable EQ head position to optimize center of gravity over the tripod and fully utilize the increased 3°-65° latitude range

Integrated handles for easy transport and portability
Ergonomically designed dovetail clamping knobs

Includes All Star Polar Alignment, Starry Night, CPWI, (and may or may not be compatible with) StarSense and WiFi

https://www.celestron.com/products/cgx-l-equatorial-mount-and-tripod?_pos=1&_sid=5eee6c65d&_ss=r


Friday, July 10, 2020

Celestron CGXL Mount Part 6

Celestron CGXL Mount Part 6
* 2 ways to get a driving rate
* How to Hibernate

In summary, once the Celestron CGXL mount is setup, there are two relatively simple ways to garner active lunar and planetary driving rates.

One is to do the Planet Alignment, search Jupiter for example, and it will slew to Jupiter and continue driving.

Two, is to do a Quick Align, then search to proceed to Jupiter for drive continuance.

Hibernate Note
(for more complicated align procedures you may want to save the alignment) The manual states "Hibernate allows the telescope to be completely powered down and still retain its alignment when turned back on." The manual says "Last Alignment" also serves as a good safeguard in case the telescope should lose power. The RTC Real Time Clock should be turned on in the Utilities Menu.

Utilities Menu - Scrolling through the MENU (9) options will also provide access to several advanced utility functions within the telescope such as; Calibrate Mount, Hibernate as well as many others.

Hibernate – Hibernate allows the telescope to be completely powered down and still retain its alignment when turned back on This not only saves power, but is ideal for those that have their telescope permanently mounted or leave their telescope in one location for long periods of time To place your telescope in Hibernate mode:

* Select Hibernate from the Utility Menu
* Move the telescope to a desire position and press ENTER
* Power off the telescope
* Never move the telescope manually while in Hibernate mode

Once the telescope is powered on again, the display will read Wake Up After pressing Enter, you have the option of scrolling through the time/site information to confirm the current setting Press ENTER to wake up the telescope.

https://www.cloudynights.com/topic/556119-celestron-avx-last-alignment-feature/

Thursday, July 9, 2020

Celestron CGXL Mount Hand Controller Part 5

Celestron CGXL Mount Part 5
CGXL "Nexstar +" Hand Controller

Important Keys
3 - Slew the telescope
4 - Catalog of objects
6 - Setup, Utilities (Tracking Rate)
8 - Select the function
9 - Go back out of current menu
11 - Move up down in menu
12 - Change motor speed when direction keys are pressed
14 - Mini USB port (need cable), firmware update, PC telescope control

====================================================


Jupiter Example
Solar System, Jupiter, Enter, Automatically slews to Jupiter

Motor Speed
The MOTOR SPEED button will instantly change the speed rate of the motors from high speed slew rate to precise guiding rate or anywhere in between.

Each rate is a number on the keypad
9 - fastest, slew between objects, locate alignment stars
1 - slowest, center objects in the eyepiece

Change Motor Speed
• Press MOTOR SPEED key. LCD displays current motor speed
• Press the number on the hand control that corresponds to the desired speed

====================================================

The Hand Control Menu
Press the MENU button (#7 on the keypad) and use the scroll buttons to select “Hand Control” and press ENTER. Use the scroll buttons to select from the following options:

Lights Control
Adjust the brightness of the number keypad and LCD

Toggle Bold Font
Change the format of the font displayed on the LCD from normal to boldface

Set Contrast
Use the scroll keys to adjust the contrast of the LCD

Scrolling Menu
Adjust how fast words move across the face of the LCD

Set Language
Change the displayed language on the LCD

====================================================

"You can choose Solar System Align to align on the moon or planets such as Jupiter or Saturn. The mount will then track sufficiently."

====================================================

REFERENCE Alignment Procedures

In order for the telescope to accurately point to objects in the sky, it must first be aligned with known positions in the sky With this information, the telescope can create a model of the sky, which it uses to locate any object with known coordinates. There are many ways to align your telescope with the sky depending on what information the user is able to provide.

• Solar System Align will display a list of visible daytime objects (planets and the Moon) available to align the telescope. "You can choose Solar System Align to align on the moon or planets such as Jupiter or Saturn. The mount will then track sufficiently."

• One Star Align uses the same time/location information but only uses one star for alignment

• Last Alignment restores your last saved star alignment and switch position Last Alignment also serves as a good safeguard in case the telescope should lose power

• Two Star Align uses the entered time/location information and allows the user to select which two alignment stars the telescope will automatically slew to

• Quick-Align will ask you to input all the same information as you would for the Two Star Align procedure. However, instead of slewing to the alignment stars for centering and alignment, the telescope bypasses this step and simply models the sky based on the information given.

Quick-Align uses all the date and time information entered at startup to align the telescope, However, instead of slewing to the alignment stars for centering and alignment, the telescope bypasses this step and simply models the sky based on the information given. This will allow you to roughly slew to the coordinates of bright objects like the Moon and planets and provides the telescope with information needed to track objects in any part of the sky (depending on accuracy of polar alignment). Quick-Align is not meant to be used to accurately locate small or faint deep-sky objects or to track objects accurately for astroimaging.

To use Quick-Align, simply select Quick Align from the alignment options and press ENTER. The telescope will automatically use the entered date/time parameters to align itself with the sky and display Alignment Successful.

Celestron CGXL Mount Hand Controller Part 5
https://otisastro.blogspot.com/2020/07/celestron-cgxl-mount-part-5.html

Celestron CGXL Mount Celestron Responds Part 4
https://otisastro.blogspot.com/2020/07/celestron-cgxl-mount-part-4.html

Celestron CGXL Mount Data Time Part 3
https://otisastro.blogspot.com/2020/07/cgxl-mount-data-time.html

Celestron CGXL Mount Understanding Part 2
https://otisastro.blogspot.com/2020/07/celestron-cgxl-mount-part-2.html

Celestron CGXL Mount Setup Part 1
https://otisastro.blogspot.com/2020/07/celestron-cgxl-mount.html

Wednesday, July 8, 2020

Celestron CGXL Mount Celestron Responds Part 4

Celestron CGXL Mount Part 4 &
Celestron Reponds

Celestron has responded to the CGXL mount question of "tracking is dead" as seen below. This blog will resume analyzing every pertinent detail of the mount.

"You can choose Solar System Align to align on the moon or planets such as Jupiter or Saturn. The mount will then track sufficiently."

* Turn the power switch on.
* The hand control will display CGX-L Ready
* Press ENTER twice (the mount will move home)
* Select City Database
* Select the nearest city to your location

* If you choose Custom Site, you will have to enter the longitude, latitude and time zone of your location

* Once the location is selected, proceed to enter the date and time (the CGX-L has a Real-Time Clock (RTC) which stores the date, time and location information for the next time you use the mount)

Choose Alignment: Solar System (Jupiter) or One Star (use Scroll buttons 6 and 9 to scroll through the list)

* Press ENTER when you have selected a suitable star or planet
* If the mount is roughly polar aligned, it will slew to the approximate location of the star or planet
* The default selection of stars is on the west side of the meridian. If your sky is obstructed in the west, press the MENU button on the keypad.

* Use the direction keys. Slew the telescope to the selected named planet or star and center it in the viewfinder of your telescope

* Press ENTER (the mount will automatically adjust motor speed for fine centering)

* Use the direction keys, center the planet or star in the eyepiece of your telescope and press ALIGN

* When prompted to add a Calibration Star, press BACK to complete the alignment

* Use keypad numbers 1, 2 or 3 to select Solar System
* Use Keypad Numbers 6 & 9 to scroll the list, find Jupiter, select Enter

Tuesday, July 7, 2020

Celestron CGXL Mount Data Time Part 3

Data for the CGXL Mount
Part 3
The Celestron CGXL mount will need the following data entered via the hand controller before it can function properly

Some sample values for testing only and to show the formatting:
Taipei Xinyi latitude, longitude, time standard
Latitudes north are + and south -
Positive longitudes are east of the Prime Meridian, and negative ones are west.

By Decimal
---------------
Latitude: (+) 25.0409° N
Latitude: (+) 121.5720° E

By Degree, Minute, Second
-----------------------------------
Latitude: (+) 25° 02' 5.40" N
Longitude: (+) 121° 34' 3.59" E

Time Zone
--------------
Time zone in Xinyi District, Taipei City (GMT+8) Greenwich Mean Time
or UTC +8, Coordinated Universal Time

Longitude (λ)
Lines of longitude appear vertical with varying curvature in this projection, but are actually halves of great ellipses, with identical radii at a given latitude.

Latitude (φ)
Lines of latitude appear horizontal with varying curvature in this projection; but are actually circular with different radii. All locations with a given latitude are collectively referred to as a circle of latitude. The equator divides the planet into a Northern Hemisphere and a Southern Hemisphere, and has a latitude of 0°. Source: Wiki

Power
Plug in the Celestron 12V 5A AC battery eliminator and switch on the mount.

Monday, July 6, 2020

Celestron CGXL Mount Understanding Part 2

Understanding the CGXL Mount Part 2

Attach the counterweights and move the mount into default (home) position. 

Tighten both RA and DEC clutch levers. 

You are now about to attach the telescope. Loosen the dovetail saddle lock knobs evenly, enough to allow the OTA dovetail to fit into the saddle.


Note the arrow should be pointing to the same side as the handle labeled “Celestron.” Slide the telescope’s dovetail bar into the dovetail saddle of the mount. Tighten the telescope in place with the two lock knobs.

Warning! The two knobs must be loosened, and then tightened together in small increments as not to create a large difference, or the bolts will strip out the threads and the soft aluminum mount will need to be taken to the machine shop and reworked. DO NOT OVERTIGHTEN!
Loosen ra and dec levers. Balance the telescope in ra and dec, returning to the home position for safety as needed.

Power On Home Position Tip
The mount’s internal switches will take the mount to its home position when you power it on but you can still manually position it before powering on the mount Simply unlock the two lock levers, and move the telescope to the desired position.

Sunday, July 5, 2020

Celestron CGXL Mount Setup Part 1

DIGITAL CGXL MOUNT
PART 1 SETUP
This continuing blog series will examine the most important functional aspects of the Celestron digital CGXL telescope mount including setup and operations for first time users.

Compared to old school analog telescope mounts, the CGXL is one of the most sophisticated and complicated mounts on the planet. I hope this guide will serve to help overcome the massively steep learning curve and serve as a master's reference for troubleshooting.

Everything you need to know for basic operation of Celestron's massive CGXL mount, which works with the Celestron 14-inch Edge HD OTA or the 9.25-inch Edge HD OTA. This is potentially the shortest path of instructions to getting a new CGXL mount up and running for planetary viewing and/or imaging.


Setup the tripod and mount using the hidden allen wrench.


Power Switch
The photo shows the power switch position. It was important to immediately shut off the mount during a runaway condition when WIFI failed, or the OTA would crash into the metal railing or break through the sliding glass door.

Hand Control Connect
Plug the hand controller into AUX1.

Counterweight Shaft Position
Setup the counterweight shaft to position in between two tripod legs due to the low latitude in Taiwan.

Vibration Suppression Pads
Place 3 Celestron vibration suppression pads under the three tripod legs on the skyscraper deck.

Level the Mount
Use the green bubble levelers and make the tripod legs longer or shorter.


Rough Polar Align
As the North is blocked by the skyscraper, position the mount to North using a compass. As the deck has steel girder construction, and the mount has magnetic locations, approximate using a compass from several perspectives, before adding weight. Make sure the compass is raised above the highly conductive bold. I used a non-conductive plastic bottle cap.


Adjust Mount Latitude
Before adding weight, loosen the two altitude lock knobs and turn the altitude adjustment knob until you are roughly set to your latitude indicated on the latitude scale, then retighten the altitude lock knobs.